Wise, formerly Transferwise, is one of the most well-known fintech companies in the world. Starting as a solution for sending money abroad without racking up huge exchange fees, it is now a global multi-currency banking platform with over 10 million customers.
We’ve praised it before as one of the best banking products that nomads can register for remotely - check it out if you want to explore all the main options. If your heart is set on Wise, though, you will quickly come to realize in this article that setting up either a personal or a business account with them is very straightforward.
All you really need to do is:
- Register for an account here
- Verify your personal information
- Start sending money
Of course, there are a couple of details that you will need to know, such as how and when you will verify your identity, and nationality requirements for sending and receiving money.
For all of that, let’s take a further look…
Requirements
Anyone over the age of 18 with a valid ID in one of the accepted countries can open a Wise account. Citizens and residents of most countries can open an account with Wise, however the degree of services may vary.
For example, people in most countries can send money, although it will not always be in the local currency. For a full list of accepted currencies with Wise, see below in our FAQ.
In order to get the Wise debit card, you must be a resident in Europe, the US (except Nevada), Canada, Brazil, Australia, New Zealand, Malaysia, Singapore, Philippines (some customers), or Japan. See here for the most up-to-date list.
The account opening process
Wise has a straightforward registration process. Of course, it varies depending on your nationality and residency. This is because verification requirements are different from country to country, and as mentioned, some services are not available everywhere. Having said that, you can open a Wise account in these easy steps.
- Fill out their online registration form and create an account
- Set up multi-currency accounts (optional)
- Complete the verification process
- Apply for your Wise debit card (if eligible)
1. Online registration and two-step verification
Creating an account is as straightforward as any other account registration on the internet. All you need to do initially is go here.
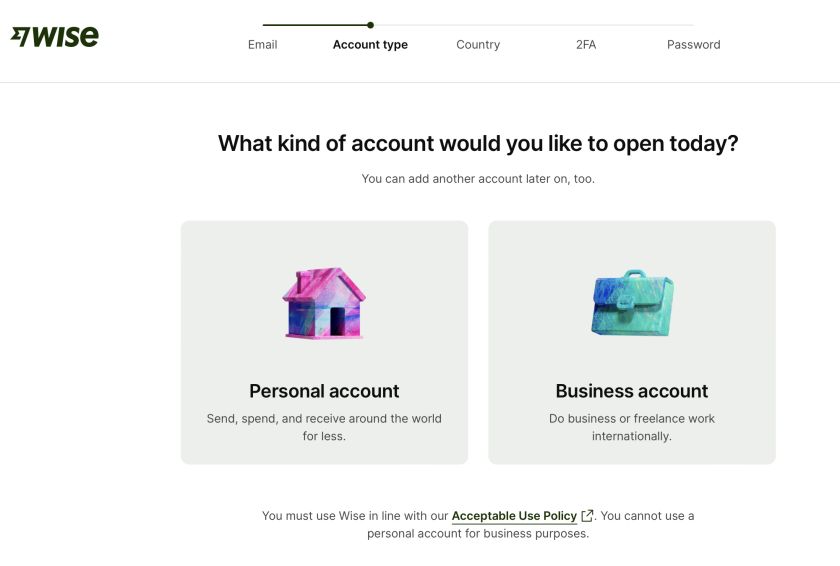
First, provide your email, select whether you are looking for a personal or business account, and set your country of residence (you’ll have to provide proof of address later).
Then you’ll have to do two-factor authentication via phone number (can be from a different country than residency) and finally choose a password.
At a later stage you can also download the Wise app and complete the two-step verification this way instead, which is especially useful and more practical if you are a digital nomad, since your phone number may often change to a local one.
You can also opt to sign in with Google, Facebook, or Apple if you wish to.
Next, you will agree to the terms of use and privacy policy, and have to verify your email address through a link they send you.
2. Set up Wise multi-currency account
Next, you can open up a Wise multi-currency account. This will allow you to send and hold more than 40 currencies, and receive money in 22 different currencies. In order to set this up, all you need to do is provide Wise with:
- Your legal name
- Date of birth
- Phone number
- Address
- Postal code
- Country of residence
- The primary currency which you would like to use (although as mentioned, it’s a multi-currency account)
3. Complete verification
So far, we haven’t seen any serious anti money laundering (AML) questions or verified our identity. To set up an account with Wise, including the multi-currency account, you don’t need to provide any of this information from the start. Although, when you actually decide to send some money or fund your Wise multi-currency account, you will be prompted to provide more information about yourself.
Verification may differ from country to country, as the AML requirements vary. Some are stricter than others, and also, it sometimes depends on how much money you plan on sending. Usually you will be asked to provide the following documents:
- A valid ID document – this can be a passport, driver’s license, or a national identity card. In some cases (where you are not required to verify yourself from the start), you can just transfer money from another one of your bank accounts, as this is also considered a valid form of identification by Wise.
- Proof of address – this can either be your utility bills (excluding mobile phone bills), a bank or credit card statement, a vehicle registration, driving license showing your address and expiry date, or any other government-issued document showing your address.
If you send a large amount of money (like $80,000 and upwards), you may also be asked for additional documents. This usually means providing proof of where the money is coming from.
You may not be asked all of this at once, as previously mentioned, Wise tends to only ask these questions when they are fully necessary, to make the process as simple as possible. The verification process listed below is based on what most, if not all, European residents are asked for.
First, you will be asked to select your main reason for using Wise from a predefined list of options.
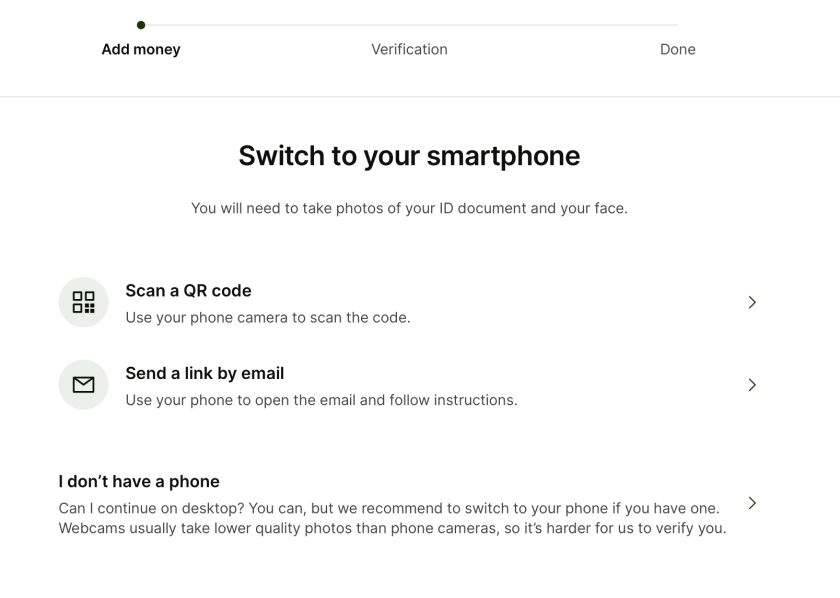
Then, you will have to verify your identity through Wise’s selfie verification method, by taking a photo of yourself with your document either with your phone or your computer webcam.
You do this by either accessing a link via your email or scanning a QR code. Once you have navigated to the correct link, you will have to take pictures of both your document (passport or local ID) and face visible.
To avoid fraud, you can’t just send a copy of your document that you have taken before. The photo has to be taken on the spot, so make sure you look beautiful 💁 and have your document on hand.
You then may be asked to provide your proof of address through one of the options mentioned above.
Once you have completed the process, Wise usually only takes a few minutes to review your information. Sometimes, however, it can take up to two working days. After this, you can start sending, receiving, and holding money in various currencies.
Disclaimer: This list is for information purposes only and is not meant to be a comprehensive list of all of the items that Wise may request to verify a customer’s identity. Eligibility is subject to verification of customers’ identity.
4. Order your Wise debit card (optional)
If you are located in Europe, the US (except residents of Nevada), Australia, Canada, New Zealand, Singapore, Malaysia, Philippines (some customers only), Brazil, or Japan, then you are in luck. You can also get your hands on the Wise debit card.
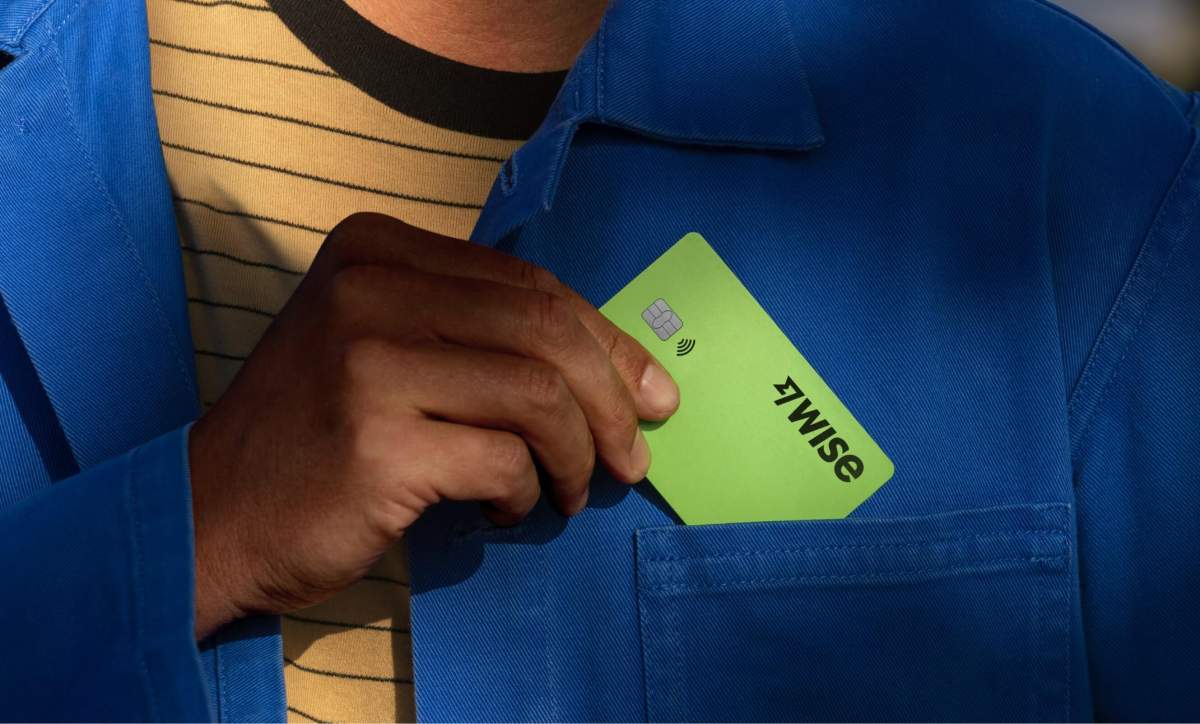
Since it supports spending in over 200 countries and holding 50 currencies, as well as ATM withdrawals anywhere, it’s by far the most convenient way to navigate the world without having to worry about incurring huge fees when using your card.
To get the card, you will need to have completed the verification process above, but otherwise, you simply need to provide your address for them to deliver the card and pay a small fee (pricing may vary by country but usually it is around $7).

Once you have received your card in the mail, you will need to activate it. If you have a Visa card, you can activate it simply by making your first payment in a store with your pin. If it’s Mastercard, they will provide you with a 6-digit code which you can use to activate your card via the website.
ℹ️ Good to know: If you are from the US, Wise also needs to verify your social security number, and you must activate your card while still in the US.
Wise Business account
If you have a cross-border business, meaning you often need to receive money as well as invoice others all around the world, Wise has a Business option that allows you to have the same benefits of a personal account, but for the whole company. The verification process is, for obvious reasons, more extensive but still relatively straightforward. And in my opinion, totally worth it if you have a company operating across borders.
Wise Business offers the ability to send and receive money from more than 70 countries. If you have employees around the world with various local bank accounts, it’s incredibly useful as you can pay them all at once (up to 1000 people) and with very low transaction fees.
On top of that, you can provide your employees with Wise debit cards for their business expenses, which you will be able to manage and review from your own administrative account.
If you already use a third-party accounting platform, Wise also integrates with several, such as Xero or Quickbooks. You will also gain access to Wise’s API so you can connect to your own interfaces as well.
It’s worth remembering though that Wise is not a bank technically speaking (what I mean is, they don’t provide loans or high-risk investments with your money), so in many ways is not a substitution for your main bank account, but rather a convenient way for small- and medium-sized businesses to make regular payments across borders in different currencies.
Verification
Registration is the same as with a personal account, however, to set up your business account properly, you will need to answer a few additional AML questions. This includes:
- Your business registration
- Location of your business
- Your industry
- Your online presence
- Names of the business’ owners and board members
- Dates of births of owners and board members
- Residence of owners and board members
You will also need to verify that your business is compatible with Wise’s acceptable use policy, as most restricted or regulated industries (crypto, gambling etc.) are not accepted.
Wise for Business is only available in Europe, Singapore, Hong Kong, the US, Japan, Australia, Malaysia, Canada, Brazil, and New Zealand.
On top of this, you may need to provide additional information depending on what country you are in. For US businesses, for example, you will need to tell them what kind of business you have (LLC, Corporation, non-profit, LP, etc.) as well as provide any relevant tax identification numbers.
Similar rules exist for Singapore, Hong Kong, Japan, and New Zealand. Also, which type of business is accepted depends on the country as well. For instance, Japanese NGO’s are not allowed to set up a Wise Business account.
Note that in some countries (e.g. most of Europe), there’s a nominal business account opening fee. While typically around €50, it can be higher in some markets. In markets where this fee is charged, there’s no extra charge for opening additional currency accounts.
Get your Wise Business card
The process is the same as for a personal debit card, and all you need to do is provide the address you want Wise to send the card to, and activate it according to the instructions. There will be an initial application fee, of around $12 (depending on local pricing). It will also cost an additional $3 per card if you wish to extend the usage to your employees or other members of your business.
Once the cards have been ordered, you will want to set up the various permissions and the types of things your employees have access to. Wise Business has five different types of users that you can choose from - Admin, Payer, Preparer, Employee, and Viewer. You can set up individual settings such as maximum limits and whether to allow contactless payments. All of it can be managed from Wise’s platform.
Not yet sure if Wise is for you?
While Wise is by far the best known name in the fintech world, we have compiled a guide with the best banks for international travelers, including other alternatives that suit the needs of nomads and travelers all across the globe.
In addition, we have compiled a guide of suitable business banking products to help you operate across the globe. Hope you find what you need!
FAQ
What countries and regions can you send money to?
In addition to the eurozone countries in Europe, you can currently send money to the following countries with Wise:
Argentina, Australia, Bangladesh, Brazil, Bulgaria, Canada, Chile, China, Colombia, Costa Rica, Croatia, Czech Republic, Denmark, Egypt, Georgia, Guatemala, Ghana, Hong Kong, Hungary, Indonesia, Israel, Japan, Kenya, Malaysia, Mexico, Morocco, Nepal, New Zealand, Norway, Pakistan, Philippines, Poland, Romania, Singapore, South Africa, South Korea, Sri Lanka, Sweden, Switzerland, Liechtenstein, Tanzania, Thailand, Turkey, Uganda, Ukraine, United Arab Emirates, United Kingdom, United States of America, Uruguay, Vietnam, and Zambia.
For the most up to date list, see here. Please note that while you can send money to all these countries, Wise doesn’t cover all local currencies.
What countries can receive the Wise card?
In Europe, most countries are covered including:
Austria, Belgium, Bulgaria, Croatia, Cyprus, Czech Republic, Denmark, Estonia, Finland, France (only Metropolitan), Germany, Greece, Hungary, Iceland, Italy, Ireland, Latvia, Liechtenstein, Lithuania, Luxembourg, Malta, Netherlands, Norway, Poland, Portugal, Romania, Slovakia, Slovenia, Spain, Sweden, Switzerland, United Kingdom, Gibraltar (British Overseas Territory) and the UK Crown Dependencies: Guernsey, Isle of Man, and Jersey.
Outside of Europe, the list extends to Singapore, Malaysia, Japan, Canada, the US (except for residents of Nevada), Australia, New Zealand, and Brazil.
Join  now!
now!
Get free access to our community & exclusive content.
Don't worry, I won't spam you. You'll select your newsletter preference in the next step. Privacy policy.
